Adding custom fields to a page
In this lesson: db, fieldtypes, getCMSFields
Silverstripe CMS version: 4.x (stable)
In the previous lesson, we developed a structure for our Travel Guides section that provides a list view of articles, each with a link to their own detail page. Most of these templates are still hardcoded with static content, however, and need to be integrated with the CMS. In this lesson, we’ll start looking at how to add some custom fields to these pages to make them really come to life.
 UncleCheese
Taking inventory of custom fields
In the previous lesson, we developed a structure for our Travel Guides section that provides a list view of articles, each with a link to their own detail page. Most of these templates are still hardcoded with static content, however, and need to be integrated with the CMS. In this lesson, we'll start looking at how to add some custom fields to these pages to make them really come to life.
Let's first look at the list page and see if we can identify some fields that will be need to be editable in the CMS. At first glance, the following fields stand out:
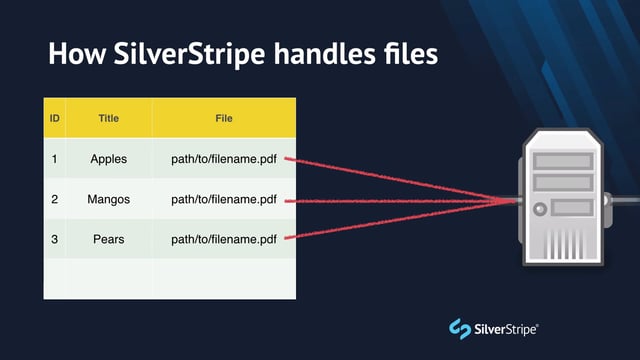
The date of the article: Every record in is timestamped with its creation time, which is contained in the $Created variable. This could work in a pinch, but most of the time, content authors will want to use a custom date for the articles, since the date they are created is not necessarily they are published to the website. We'll therefore need to create a custom field for the date.
The number of comments: We can skip this one for now, as that will be addressed when we cover adding comments to the articles.
The list of categories: This is another piece that we can cover in a future lesson that will cover handling data relationships.
The image: Each article should have its own image that will render as a thumbnail in list view and full size on the detail page. We'll need the CMS to provide an image uploader for each article, which is a bit out of scope for this lesson, so we'll skip it for now.
The teaser: The short snippet of text that appears in list view to give a preview of the article contents is often called a "teaser." Often times, this is just the first sentence or paragraph of the article, but to give the content author more control, we'll provide a custom field for the teaser. If it isn't populated, we'll fallback on the first sentence of the article. That will cover our bases nicely.
Clicking through to the detail page, we see that one additional field has been added for the author of the post.
Adding new database fields
Since all these fields appear on the ArticlePage records, we'll only need to be working with that class. Remember, even though we see the fields on the ArticleHolder template, it doesn't necessarily mean those fields belong to the ArticleHolder. In this case, they appear in a loop of ArticlePage records, so that's where we'll define them. It's very important to maintain a clear conceptual separation of the template and the model.
Let's define a new private static variable in ArticlePage.php called $db. Set it to an empty array.
class ArticlePage extends Page
{
private static $db = [];
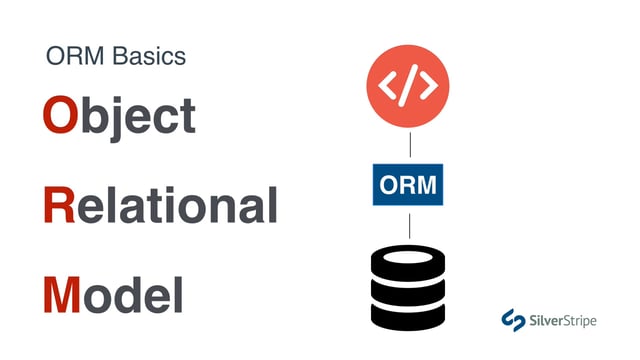
}The $db array is the cornerstone of data modelling in SilverStripe. Its function is pretty simple -- it maps a field name to a field type. So the keys of the array are going to represent the variables that you can invoke on the object, such as $Content, $Title, etc, and the values of the array will be the field type. We'll talk more about field types in just a moment, but for now, let's populate this array with the fields we need.
class ArticlePage extends Page
{

  private static $db = [
    'Date' => 'Date',
    'Teaser' => 'Text',
    'Author' => 'Varchar',
  ];
We've defined a field called $Date that will store, appropriately, as a date. The $Teaser field will be simple text, and the $Author field will also be text, but since we know it will contain a short string of characters (a person's name), we can declare this as a Varchar, which by default is limited to 100 characters.
Since we made changes to the database, let's run /dev/build and we should see some green text indicating that new fields were created.
About Field Types
If you've done a bit of databasing, you're probably familiar with field types. Simply put, it's a bit of metadata that informs the database what type of data will be stored in a given column. There are a number of reasons why this is a good idea. First, it wouldn't make sense to allocate the same amount of memory to a field that will only ever contain a postal code as you would a field that will contain 100,000 words of content. Second, by assigning a field type, the database can interact with each column in its own way, for instance, two date fields will compare differently than two text fields, and trying to store the text "lol fail" in a decimal field will simply... fail.
Common field types in MySQL include:
- Varchar: A string of characters, with variable length
- Boolean: True or false values
- Integer: A number, with no decimals
- Date: The year, month, and day
And many, many more.
SilverStripe puts its own layer of abstraction over these database field types. While many of them overlap, such as "Varchar," "Boolean," and "Date," a lot of them are unique to the SilverStripe Framework, as well. This is because a field type in SilverStripe not only informs the database how to store the data, but also how the template should display the data. For instance, a field with the type Text will escape any HTML, but HTMLText will not. In the database, they're both stored as Text, but the custom field type HTMLText has a very important effect on how SilverStripe handles the rendering of the data. We'll talk more about all the features afforded by custom field types in future lessons, but for now, it is important to be mindful of what kinds of data you expect to be storing in each field and how you will display it.
So how do you know which field types are available? Your best resource in this case is the source code. Just browse framework/src/ORM/FieldType and you'll see a list of PHP classes whose names can all be used as field types. In version 4, they include:
- DBBigint
- DBBoolean
- DBClassName
- DBComposite
- DBCurrency
- DBDate
- DBDatetime
- DBDecimal
- DBDouble
- DBEnum
- DBField
- DBFloat
- DBForeignKey
- DBHTMLText
- DBHTMLVarchar
- DBIndexable
- DBInt
- DBLocale
- DBMoney
- DBMultiEnum
- DBPercentage
- DBPolymorphicForeignKey
- DBPrimaryKey
- DBString
- DBText
- DBTime
- DBVarchar
- DBYear
Note that while all these field types are prefixed with DB, most of them are aliased so that they will work in the $db array without that prefix, e.g. SilverStripe\ORM\FieldType\DBVarchar can be referred to simply with Varchar.
It looks a bit daunting, but rest assured that 90% of the time, you're going to using one of six or seven common field types.
Adding CMS Interface
Our database is ready to store these new fields on our page type, so now it's time to offer the user a way to populate those fields in the CMS. Once again, we'll be dealing strictly with the ArticlePage class for this.
Let's define a new method that exposes the API for updating the CMS interface for this page.
class ArticlePage extends Page
{
  private static $db = [
    'Date' => 'Date',
    'Teaser' => 'Text',
    'Author' => 'Varchar',
  ];

  public function getCMSFields()
  {
    $fields = parent::getCMSFields();

    return $fields;
  }
The method getCMSFields is what the CMS invokes to create all of the tabs and fields that we see in the editing interface. It should return a FieldList object. By storing the result of parent::getCMSFields() in a variable, we can start with all of the fields that are in the parent class. If we skipped this step, the page would be missing many critical fields, such as Title, Content, URLSegment, etc. We can always remove some of those fields piecemeal, but it's best to start with everything in the parent class and make our changes from there.
In this case, we're going to want three new fields. Let's use the FieldList API to add some new form inputs.
use SilverStripe\Forms\DateField;
use SilverStripe\Forms\TextareaField;
use SilverStripe\Forms\TextField;

// ...

  public function getCMSFields()
  {
    $fields = parent::getCMSFields();
    $fields->addFieldToTab('Root.Main', DateField::create('Date','Date of article'));
    $fields->addFieldToTab('Root.Main', TextareaField::create('Teaser'));
    $fields->addFieldToTab('Root.Main', TextField::create('Author','Author of article'));

    return $fields;
  }
Let's walk through this step by step:
addFieldToTab('Root.Main'): The tabs in a field list are identified using dot-separated syntax. This is because tabs can be nested in other tabsets, and digging through several levels to get the one tab set you want to add to would be tedious. The dot-separated string identifier allows you traverse the tab set ancestrally, where the highest level is on the left, and the tab you want to add to is all the way on the right. The 'Root' tab is the highest level tab set, assigned to all pages. Most fields in the CMS are on the "Main" tab, including Title, MenuTitle, and Content, but if you were to choose any arbitrary name, such as ‘Root.Sausages', the FieldList would automatically create that new tab for you.
[SilverStripe\Forms\FormField]::create(): Every form input has its own class in SilverStripe, and the number of available form fields reaches far beyond just those that are in the HTML5 specification, for instance, the rich text editor you see in the CMS is an HtmlEditorField. Form fields aren't about HTML abstraction so much as they are about creating a UI for storing data. It is not uncommon in a SilverStripe project to create your own custom form fields that offer the rich editing experience you'd like to have.
The first argument of the form field constructor is the field name. This should correspond exactly to the $db field it is saving to. The second argument is an optional label for the field. If left null, the label will be the name of the field, as we see in the case of our Teaser field.
Let's go into the CMS and edit any ArticlePage. Notice our new fields at the bottom of the page. Try populating them, and ensure that it saves state.
There are a couple usability issues we can address here. One is that the fields are all pinned to the bottom of the page, below the content editor, making it difficult for the user to find. Fortunately, the addFieldToTab() method accepts an optional argument to specify an existing field that the new field should come before. In this case, we want these fields before the Content field.
  public function getCMSFields()
  {
    $fields = parent::getCMSFields();
    $fields->addFieldToTab('Root.Main', DateField::create('Date','Date of article'),'Content');
    $fields->addFieldToTab('Root.Main', TextareaField::create('Teaser'),'Content');
    $fields->addFieldToTab('Root.Main', TextField::create('Author','Author of article'),'Content');

    return $fields;
  }
Second, it might not be too clear to the user what "teaser" means. Let's add some help text.
  public function getCMSFields()
  {
    $fields = parent::getCMSFields();
    $fields->addFieldToTab('Root.Main', DateField::create('Date','Date of article'), 'Content');
    $fields->addFieldToTab('Root.Main', TextareaField::create('Teaser')
     ->setDescription('This is the summary that appears on the article list page.'),
        'Content'
    );
    $fields->addFieldToTab('Root.Main', TextField::create('Author','Author of article'),'Content');

    return $fields;
  }
Every form field exposes a public API that you can use to configure the field. Other useful methods include setMaxLength() or setRows() and setCols() for textareas.
Reload the edit screen in the CMS and see that our changes have taken effect.
Adding the fields to the template
Most of the hard work is done now. It's time to insert all the variables in to our templates to pull in the CMS content. In ArticleHolder.ss and ArticlePage.ss replace any references to the date with $Date, the author with $Author, and the teaser with $Teaser. Reload the page to see the the articles are pulling in the new content.
One issue we can see is that the date is not formatting the way it should. Since we casted the field as Date, we have some control over that at the template level. The Long method will give us what we need. Replace $Date with $Date.Long.
There are a number of other methods available on the Date class to help you get the format you want. You might try $Date.Nice, or, if you're in the USA, $Date.NiceUS for a format that puts the month first. If all else fails, you can always invoke $Date.Format which essentially exposes PHP's date() method, allowing you to pass a string of text to get the format you need.
Lastly, we said earlier that we would like the teaser to be an optional field, falling back on the first sentence of the content if it isn't populated. Let's set that up.
    <div class="info-blog">
      <ul class="top-info">
        <li><i class="fa fa-calendar"></i> July 30, 2014</li>
        <li><i class="fa fa-comments-o"></i> 2</li>
        <li><i class="fa fa-tags"></i> Properties, Prices, best deals</li>
      </ul>
      <h3>
        <a href="$Link">$Title</a>
      </h3>
        <% if $Teaser %>
          <p>$Teaser</p>
        <% else %>
          <p>$Content.FirstSentence</p>
        <% end_if %>
    </div>
All text-based field types in SilverStripe offer methods such as FirstSentence, FirstParagraph, LimitCharacterCount, and more, to give you some control over the presentation on the template. Using these methods to create teasers is very common.